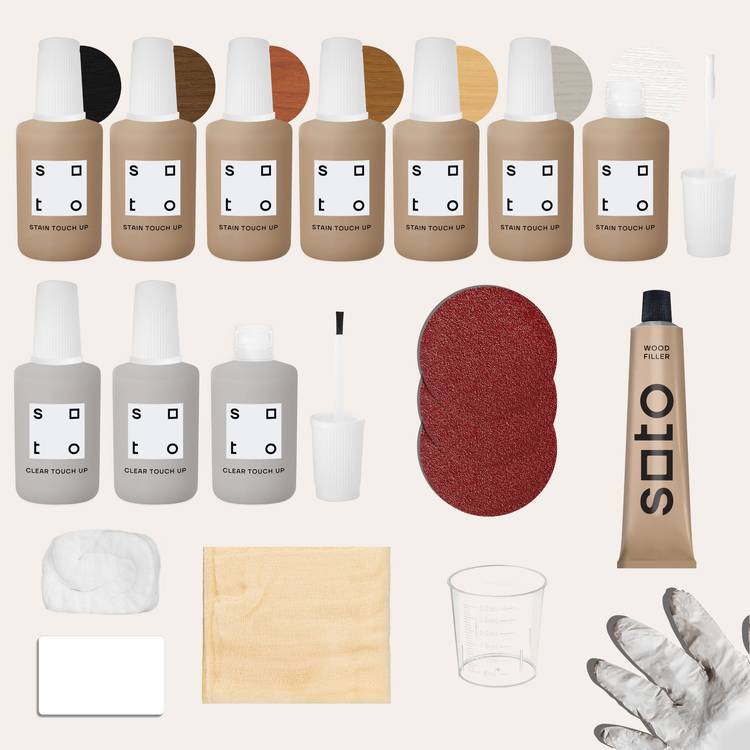
Includes everything you need for a beautiful repair: 7 different colors of high-quality wood stain and sealer in one, that offer the same beauty and durability of the original factory finish of your pieces; 3 bottles of Soto Clear Touch Ups in varying levels of gloss; Wood Filler + scraper for a smooth finish; a Mixing cup to create an even closer match, if needed; Tack Cloth for removing dust and particles; 3 sanding discs (80 grit, 120 grit, and 240 grit) to get your furniture prepped and smooth; as well as gloves and a Disposable Cotton Towel for easy clean-up.
To use:
1. Find your best match: in a discreet area, sand off a small amount (approx. 0.5” x 0.5”) of coating down to the bare wood. Select 3-4 of the closest Wood Stain Touch Up colors and apply 1 stroke to the bare wood area. Choose the color that matches your surface.
* Two or more Stain Touch Ups can be mixed together for a more exact match. Remove the inner plug from the bottle and pour a small amount of each stain onto a plate or disposable container. Slowly add the darker color to the lighter color, testing along the way, applying the new stain color to the exposed wood with enclosed clean touch up brush, until you have found the perfect match.
2. Clean surface with Soto's Multi-Surface Spray Cleaner or mild detergent to remove oils, grease or dust. Scrape off edges or raised areas. Remove any loose paint, stain or wood and gently sand the area starting with 80-grit, followed by 120-grit, then 240-grit. Always sand in the direction of the grain, and sand in straight lines. Vacuum and/or wipe away dust with enclosed tack cloth after each sanding.
3. Open Wood Filler and puncture tip with cap. Slowly fill cracks or grooves with wood filler, slightly overfilling above the surface. Scrape excess wood filler from surface. Allow to dry to 1 hour or until visibly dry to touch (dry time varies based on size of groove).
4. Sand with 80-grit sandpaper, followed by 120-grit, then 240-grit. Wipe sanding dust with tack cloth.
5. Shake bottle for at least 10 seconds to thoroughly mix up the stain.
6. Apply stain over defect only, attempting to minimize overlap with existing coating. If overlap occurs, dampen the included Disposable Cotton Towel and gently wipe excess stain while it’s still wet. Dry for 30 minutes. For a darker finish, apply additional coats, drying to touch in between. For a more transparent stain, mix with water.
7. Choose your clear coat: How shiny is your surface? Is there no sheen, a bit of glare, or is it extremely glossy? Use our chart to find out which clear coat you should choose:
* No shine or gloss = No clear coat needed, the stain offers a matte finish
* Very little shine = Satin
* A small amount of shine = Semi-Gloss
* Very shiny (like a new car) = High-Gloss
* You can also test all 3 clear coats over your discreet area, allowing to dry for about 10 minutes, to determine your best match.
8. Once you find your match, apply included Clear Coat Touch Ups over the stain in long smooth strokes, trying to eliminate visible brush strokes. Allow to dry overnight before exposing surface to normal wear.
NOTE: To refinish your “test” area, sand down the coating to the bare wood, then follow the rest of the instructions by applying a stain and clear coat over the bare area to blend it with the surrounding surface.
